Showing posts with label android. Show all posts

Monday, November 2, 2015

Nexus 6p sRGB Mode Comparison


I recently received my Nexus 6p after preordering it and have been putting it through it's paces.  I did notice right out the box that the screen was quite saturated compared to my iPhone 6.  This seems to be due to the AMOLED display, and oversaturation is just a byproduct of AMOLED displays.  But there is a hidden option within the Developer Tools which allows you to set the phone to sRGB mode.  I decided to give this a try and see what the results would look like.  Turning this option on does tend to wash out the colors.  I have included pictures below where you can find a comparison between the sRGB mode being on/off and compared to an iPhone 6.

Sunday, February 16, 2014

AotD: AntennaPod - A Free Open Source Podcast Manager for Android

One of the first apps I missed when switching over to Android from iOS was a podcast manager.  There are quite a few for Android, one that I come across a lot is Pocket Casts ($4), but I was looking for a free alternative.  I recently stumbled across AntennaPod and has gotten the job done so far.
It's easy to use, looks good, and best of all it is free.  It is in beta so you stumbled across a few bugs but so far it has been solid for me.  They might charge in the future when the work out all of the bugs, but for now it is free so go grab it.

Tuesday, February 11, 2014

AotD: Grooveshark - Free Music Streaming App on Android

UPDATE: Since Grooveshark has shut down this service no longer works.
For those that don't know, Grooveshark is one of the many free music streaming websites available similar to Rio and Spotify.  Unlike those mentioned, you do not have to pay when you want to stream to your mobile device.

The problem with Grooveshark was there are no longer native applications on the Google Play Store or the iTunes AppStore. While you can use the mobile browser to listen to music via HTML5 the experience is slightly laggy and not as fluid as you would find on a native application. Luckily someone was nice enough to create a native application for users on Android and it looks amazing.  You'll need to allow the ability to install downloaded APK's.  Click the image to take you to more images and the APK file.

Thanks to Bejan Kanga for his hard work.

Thursday, February 6, 2014

AotD: Weatherlove - A Free Clean & Simple Weather App for Android

Weatherlove is a clean and simple Android app yet delivers the information you need.  It is beautifully done and offers many customization options including icons and a few themes.  There are various widget sizes and includes the option to display the temperature in the status bar along with providing 3 days worth of forecast in the notification menu.  My pesonal favorite widget would probably be for the lockscreen allowing you to display the weather in the style of Cyanogenmod.


So if you are looking for a new weather app that is clean, simple, and informative, with a ton of customization options, I would highly recommend checking out Weatherlove.


Wednesday, February 5, 2014

Alternatives to eBay for Selling/Buying Electronics

If you tend to keep up with technology you might find yourself with extra electronics.  Well, don't let them sit and gather dust, sell them sooner rather than later to get the most out of them.
eBay used to be the go to place when trying to sell anything and everything but the fees they charge are outrageous and can add up quick.  Fortunately for us there are other options.

Craigslist is a great way to sell/buy your electronics locally.  It is free to post your items and there are no fees that you need to consider.  Since it's mostly cash only transactions it is best to meet in public places when doing the exchange.  The downside to buying locally is that you have to make sure what you are buying is legit as there are no returns.
Amazon is another option if you are looking for a broader audience like eBay with less fees.  There are still fees that you have to consider but they are not nearly as high as they are on eBay since eBay gets you on eBay fees and Paypal fees.  The fee calculation depends on various factors but you'll most likely end up making more money.  The downside is that not as many people check Amazon, but it would still be worthwhile to sell.  The positive when buying is that Paypal is not required and you can just use a standard credit card.
Swappa is newer and probably the least known website for selling/buying electronics.  There are no fees to post as a seller nor are there fees when you sell your item.  The price that you post your item includes a $10 surcharge that the buyer pays.  When selling your phone you'll have to input your IMEI number which they'll check to determine if it is whitelisted.  That is probably the best part about Swappa is that you can have confidence that the item you are buying is legit and is not blacklisted.

If there are any other options that you know of feel free to comment below.  I know Craigslist and Amazon were pretty obvious to most, but Swappa might be new to a few.

Monday, January 27, 2014

How to Return to Stock 4.4 on Nexus 4

After many searches and trying to follow multiple guides I was unable to find a working guide on how to return my custom rom'ed Nexus 4 back to stock.  But, I finally came across an extremely easy way to return to stock 4.4 on my Nexus 4 with very little effort.

*As of writing this stock 4.4 does not include the latest updates.

There is a nice toolkit which basically does everything for you.  All you have to do is place the phone in fastboot mode and follow the onscreen instructions.  FYI, it will erase all your data. 

Nexus 4 Toolkit:
Mac / Windows

I accomplished my restore on a Mac but the method is probably very similar on Windows.  The toolkit includes everything including the stock 4.4 rom.  I was able to install 4.4 and restore the bootloader to a locked state with this toolkit, but restoring the bootloader is not necessary and you can opt out after the initial restore.

Again, all you have to do is the following:

1. Download the toolkit, extract it, and then run the tool (green android icon).

2. Unplug your Nexus 4 from your computer (if it is plugged in), power it off (if it is on), and then power it back on while holding the Volume down and Power buttons at the same time.  If successful you will see the following screen:
3. Plug in your phone and continue with the toolkit instructions.

If you are receiving the "waiting for device" message, try plugging the usb cable into a 2.0 port rather than a 3.0 port.  This was the fix for me.

4. Once it is done with the initial restore you can choose to lock the bootloader by following the additional onscreen toolkit instructions.  If not, you can unplug your phone which should now be on stock 4.4.

Hope this helps.

Thursday, January 9, 2014

Access the Contents of Your Android Device on Your Mac


If you're looking to transfer files from your Mac to your Android device there is a free application that you can download on your Mac called Android File Transfer.

This application will allow you to access the contents of your device, similar to using a file manager on your phone.  You can then use it as an external disk to use while transferring files between computers, backing up important data, or if you want to drop an APK within a folder to install an application on your phone.

On Windows you should not require any additional software as it will show up as a media device that you can then access.  If you are having trouble accessing your phone's contents just make sure that your phone is on the homescreen.

Monday, January 6, 2014

Nexus 5, International Version, Not Working on AT&T LTE and My Experience

So I recently got a Nexus 5 as a gift and was hoping to get LTE with AT&T.  Unfortunately I wasn't able to get LTE working since the version Nexus 5 that I have is an international version which isn't compatible with the LTE bands for AT&T.  I get fine HSPA+ speeds, but was hoping to get LTE.

You can check which version phone you might have by turning your phone off and then holding the power button along with the volume down button and you should see a model number.  D820 for North America, D821 for the international version.  It's only possible to buy the North American version within the US from official locations.  If you are trying to buy the international version, you can try Amazon resellers or eBay.

LTE Users:

If you have a North American version and are looking to get LTE on a grandfathered unlimited plan you should be able to do it over the phone or in the store.  If you've never had LTE on any previous phones, the unlimited LTE data plan will not be an option for them to select.  Have the customer service rep add an IMEI number from phone that is LTE capable, even a display model, and the unlimited LTE data plan should show up.

Non-LTE Users:

If you are getting crappy speeds on the non-LTE plan you might not be on the correct data plan (which I encountered too).  I went in to the store and was able to have them display a list of unlimited data options (since I'm grandfathered) and there was one for 3G and one for HSPA+.  Make sure the HSPA+ option is selected.

Also, if you do end up going to the AT&T store and having to switch out the sim card, I would do it yourself rather than having them do it.  The customer service reps won't handle your phone with the care you might and may damage your phone.  They damaged the sim card ejection hole on my phone, although slightly, and it's really irritating.

Thursday, November 28, 2013

AotD: Google Opinion Rewards, Earn Play Store Money by Answering Surveys

There are probably a lot of apps out there where you can do certain simple tasks on your phone and make some money, albeit a very small amount.  Well, Google released an app where you can take survey's and they'll reward you with free Google Play Store credits.


The survey's are usually really short and are most of the time multiple choice.  While you won't be able to quit your day job, this is a really simple way to add some credits to your account, which you can use towards some new apps you might have been eyeing.  The first survey I answered netted me $1.  I've answered a few more and have received a smaller amount, $0.80 one time, but free is free, and it literally took a minute to answer the survey.  They're random, so you might receive one two days in a row, you might not receive one for two weeks.  Again, it's just some extra money that can be easily acquired in a short time span.

*I was having some issues submitting my surveys and found out that an app, Adaway, on my rooted device might have been the culprit.  If you are also having that issue and have Adaway installed you might want to remove it/pause it if a survey is available.

Monday, November 25, 2013

Android App: Plex on Sale Now Until Nov 29th 60% Off

If you have been wanting to get Plex, now's the time.  They are offering 60% off as part of their Thanksgiving sale.  So instead of $5 it's $2.  Sale is for iOS, Android, and Windows devices.

If you don't know what Plex is you should check it out if you are into organizing your media and playing it from practically any device.

iTunes Link

Google Play Store Link

Windows Store Link

Sunday, November 24, 2013

AotD: wRotatr, Rotate Your Own Pictures as Wallpapers

So I've written blog posts about 2 other types of wallpaper apps.  Auto-wallpaper (for reddit) which allows you to subscribe to subreddits and rotates your wallpapers automatically on a set interval.  There's Blur which allows you to blur your existing image creating simple, unique, and color backgrounds that you are able to use.  If you wish to automatically rotate your own pictures from your gallery then you might want to check out wRotatr, which is from the makers of Paranoid Android.  This app will allow you to add images to a list and automatically rotate through them in order or randomly.  You also have to option to track certain folders which will it will then choose to rotate through.  Unfortunately it is a paid app at $1.36 so it won't hurt the pocketbook too much.


Google Play Store Links:
Auto-wallpaper (for reddit) - Free
Blur - Free w/paid option
wRotatr - $ w/no Free option

Saturday, November 23, 2013

AotD: Blur, Create Minimalistic Wallpapers with Existing Photos

If you're not into picture (landscapes, buildings, etc) wallpapers that other apps like Autowallpaper (for reddit) provides and like the more simpler and colorful wallpapers you might want to check out Blur.  It's a simple idea, the premise of blurring pictures, but by simply doing so you are able to create neat looking backgrounds which reminds me of some of the early default Nexus wallpapers.  
It's free in the Google Play store and I would recommend checking it out.  There is also a paid version for $0.99 which allows you to adjust colors and is ad free.

Tuesday, November 19, 2013

CarbonRom: How To Guide on Customization

So I recently rooted my device and decided to go with a new ROM while I was waiting for 4.4 to hit the Nexus 4 and decided to go with CarbonRom.  It's an all around great ROM with many features from all of the most popular ROMs and so far I have had no regrets.  The point of this post is not to sway you to rooting or using CarbonRom, but just a few quick guides on how to do certain customization.  Let's begin:

This is what my current homescreen looks like at the moment.  As for the wallpaper, if you haven't read my post about Auto wallpaper (for reddit) you should definitely check out the app or if you prefer simple, yet color spectrum like wallpapers, check out Blur.  I'm also currently using the beta version of Nova Launcher which takes a few bits from 4.4 Kit Kat.

11.23.2013 - Added Minimized Lockscreen Challenge
11.24.2013 - Added CRT Animation

Hide the Status Bar
I like having the status bar hidden as it adds additional screen real estate.  I set it to where if I drag my finger down it will display the status bar and if I repeat the action it will open the notification menu.


Quick Peek allows you to swipe down to display the status bar briefly and I have the status bar hidden at  all time.  If you wish you can set it do display when you have notifications which some might find useful.

Transparent Navigation Bar
The status bar and the navigation bar in 4.4 KitKat is transparent which is great because it makes the screen a look a lot larger compared to it's previous iteration.  I also made the bar smaller so it doesn't take up as much space considering it's not really displaying useful information.  If you want to completely hide it you can do so and then activate Pie Controls.  In my case since the status bar is hidden at all times I left the transparency for it at 0% because otherwise I found it difficult to read.

Arrow Keys on Keyboard
Something I thought would be strange to have I've found to be extremely useful.  I no longer have to fiddle around with the blue cursor trying to perfectly place that damn cursor line one more letter left or right.  With this setting it simply adds a left and right arrow along your navigation menu to help with those pesky cursor issues.
 

Minimized Lockscreen Challenge
When you have gorgeous wallpapers why block them with a keypad when you power on your phone.  Making this change will also allow you to see any larger widgets you might be using.  I had previously used Dashclock and had it display things like email, messages, and news, and with the keypad hidden I was able to see a more detailed view without having the expand the widget.
  

What it looks like when the lockscreen challenge is hidden.

Disable CRT Animation
If you don't like the CRT Animation you see when your display turns off you can disable it.  If you do like you have the option to change it from being a horizontal animation to a vertical one if that is what you prefer.  Unlike most of the CarbonRom settings, this one is actually in Display.


I'll continue to add more settings I find useful as I familiarize myself with CarbonRom.

Sunday, November 17, 2013

Feature List Breakdown of Popular Android ROMs

I recently stumbled across this Google Document that gives a nice comparison of features that each ROM includes.  It's pretty extensive and can give you a clear idea of what ROM you might want to try.  While it might not contain every ROM it does include the popular ones.  Hopefully this will make your decision a bit easier.

ROM Comparison Google Document

Saturday, November 16, 2013

How to Unlock the Bootloader and Root Your Nexus 4 on OS X

I finally made the dive into installing custom ROMs on my Nexus 4 but as you all know you need to have a rooted device.  I wasn't able to find very clear instructions on how to root my device, most of the ones I found were not very descriptive, so hopefully this will help clear things up.

*Images will be added shortly.

Notes:
============
I'm sure these steps are very similar on Windows, using Command Prompt instead of Terminal, but I used OS X so I can't make any guarantees if the steps are not exactly the same.

This might not be the best or easiest way, but everything I found was very similar and this method worked for me.

This works for all Android versions which includes Android 4.2.1, 4.2.2, 4.3.x, and 4.4 KitKat.

This guide includes making a backup and restoring everything.

Uses ClockworkMod.

Recommended:
============
Remove any type of security to access your phone whether it be a PIN or Pattern. (might cause issues when trying to backup).

Turn on Airplane mode to prevent any updates or incoming new messages to not be backed up.

Save the downloads and extract them to your Desktop.

Downloads:
============
Android File Transfer - Will be used on OS X to backup your data.
Nexus4Root - Contains the main files to unlock bootloader.
CWM SuperSU - Roots the device and installs SuperSU on your phone.  If using 4.3 or 4.4 use this file.  If using an older version of Android, use the one included in the Nexus4Root.zip.
Clockwork Recovery Touch - Nexus4Root includes a version of this but if you want the latest you can download and replace the file in the Nexus4Root extract.

Guide:
============ 

Go to Settings > About Phone
Tap the Build Number until you see the "You are now a developer" message.
Go back to Settings and select Developer Options.

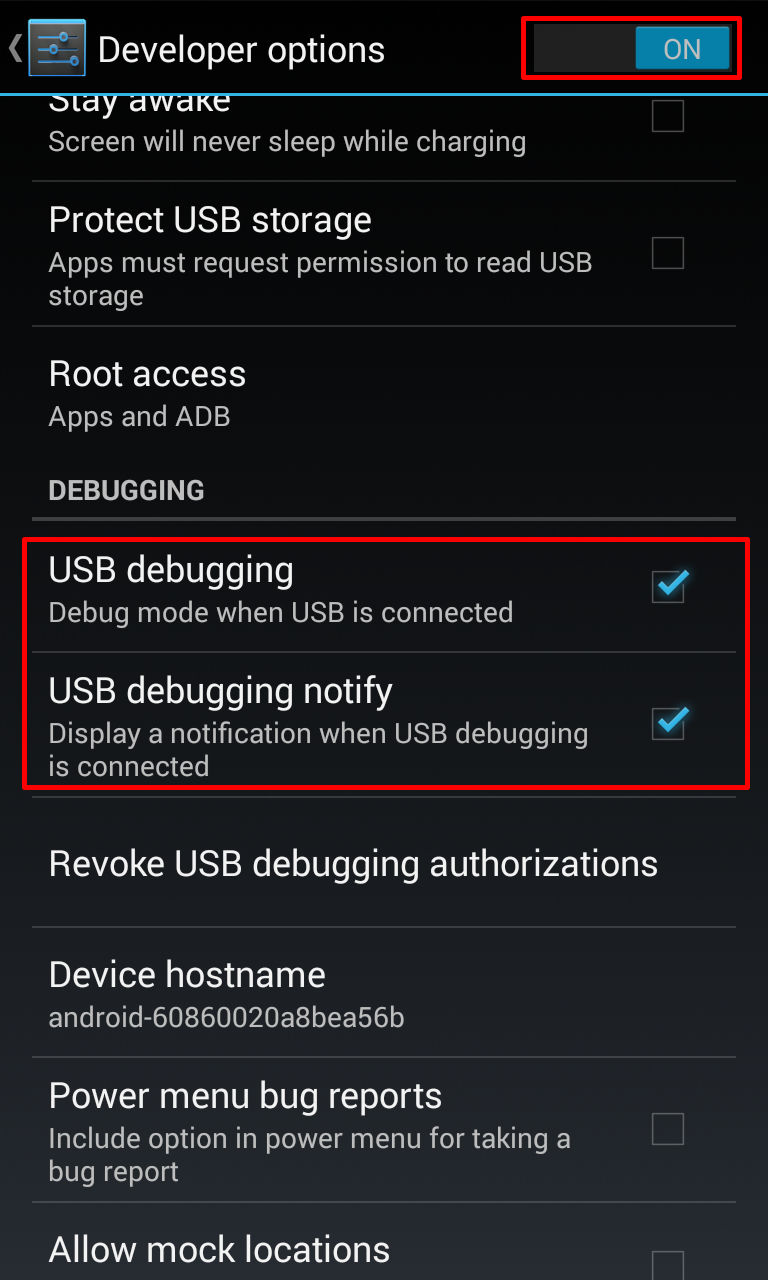
Turn on Developer Options and make sure USB debugging is checked.
If you haven’t downloaded and installed Android File Manager do so now. Also download and extract Nexus4Root to your desktop.

Connect a micro-USB cable to your phone and computer.  If you've already installed Android File Transfer it will most likely automatically open.

Backup your phone by copying all the files from Android File Transfer to a folder on your OS X desktop.

*If it looks like it is stuck your phone may have some security setting whether it is a PIN, Pattern, etc.  Unlock your phone and the transfer should start.

Open Terminal on OS X.  Using Spotlight would be the easiest way to open it.

In Terminal type cd Desktop/Nexus4Root
In Terminal type chmod 755 *

In Terminal type ./adb-mac devices


*You should see device meaning it is being detected.  If it is not listed or is offline, unplug the phone from the computer and plug it back in again.
In Terminal type ./adb-mac backup –apk –all –f backup.ab

On your phone it should display an option to backup your data.  Select Back up my data. If you wish to encrypt it with a password you can, I did not.

*The backup may take anywhere from 1-20 minutes depending on the amount of data you have on your phone.  If it looks like it is stuck, it most likely is not, just give it some time.

Once completed Power off you device and unplug it from the computer. 

Press and hold the Power button and the Volume down button until you see the bootloader menu.

Your phone should say that it is locked on the bottom of the bootloader screen which is normal.

On the bootloader screen plug in your micro-USB cable from the computer to your phone.

Go back to Terminal on OS X and type ./fastboot-mac oem unlock

*This will wipe your phone.  Hopefully you made a backup in the earlier steps.

On your device press the Volume Up button to select Yes.  Then press the Power button to confirm.  You should now see on the bootloader screen where it used to say locked it now says unlocked.  You have successfully unlocked the bootloader.  Press the Power button again to reboot your phone.

*While booting your should notice an unlocked lock which also means the bootloader has been unlocked.

Once your phone has booted you will see the set up menu as if it’s a new phone.   Everything has been wiped.  Go through the set up process until you get to the homescreen.  You can just skip everything as we’ll restore your content and settings later.

Reconnect your phone if it is not connected and copy the file CWM-SuperSU.zip by dragging and dropping it onto your phone using Android File Transfer.  Copying and pasting does not work.

Power off your phone and boot it while holding the Power and Volume Down button until you see the bootloader screen.

Go back to Terminal and type ./fastboot-mac flash recovery recovery*.img

If everything works you should see some OKAY messages in Terminal.

On your phone use the Volume toggle to switch to Recovery mode, then press the Power button.

Once in ClockworkMod(CWM) Recovery select “install zip from sdcard”.

Then “choose zip from sdcard”.

Select “0/”.

Browse/scroll and select CWM-SuperSU.zip file, the one you copied over, and select Yes, which will root your phone and install the SuperSU app.

Once completed navigate back to the main screen and select reboot system now.

If you see a message about the "ROM may flash stock recovery on boot. Fix?” select Yes.

Once your phone has rebooted you should now see a SuperSU app in your app drawer.

Congratulations, your phone is now rooted.

Time to restore your previous settings.  If you made a backup by copying all your files from Android File Transfer from your phone to your computer you can reverse the process and copy all of the files from your computer to your phone.

You’ll most likely have to re-enable Developer options by going to Settings > About phone then tapping on the Build number until you see the message saying “You are a developer”.

Go to Developer options, make sure it is on, and make sure to enable USB debugging.

Next, in Terminal type ./adb-mac restore backup.ab

On your phone selected Restore my data.

*Again, depending on how big the backup was it may take anywhere from 1-20 minutes.

Once done your phone should be back to what it was before starting this process, but with the addition of root access.

*Some apps may require you to re-enter your password.

Wasn’t so hard now was it, just a tad bit long?  Hope this helped.  Now go and install a custom ROM or kernel.

Enjoy!!

Not sure which ROM you want to try.   Check out my other article.