Showing posts with label nexus 4. Show all posts

Monday, January 27, 2014

How to Return to Stock 4.4 on Nexus 4

After many searches and trying to follow multiple guides I was unable to find a working guide on how to return my custom rom'ed Nexus 4 back to stock.  But, I finally came across an extremely easy way to return to stock 4.4 on my Nexus 4 with very little effort.

*As of writing this stock 4.4 does not include the latest updates.

There is a nice toolkit which basically does everything for you.  All you have to do is place the phone in fastboot mode and follow the onscreen instructions.  FYI, it will erase all your data. 

Nexus 4 Toolkit:
Mac / Windows

I accomplished my restore on a Mac but the method is probably very similar on Windows.  The toolkit includes everything including the stock 4.4 rom.  I was able to install 4.4 and restore the bootloader to a locked state with this toolkit, but restoring the bootloader is not necessary and you can opt out after the initial restore.

Again, all you have to do is the following:

1. Download the toolkit, extract it, and then run the tool (green android icon).

2. Unplug your Nexus 4 from your computer (if it is plugged in), power it off (if it is on), and then power it back on while holding the Volume down and Power buttons at the same time.  If successful you will see the following screen:
3. Plug in your phone and continue with the toolkit instructions.

If you are receiving the "waiting for device" message, try plugging the usb cable into a 2.0 port rather than a 3.0 port.  This was the fix for me.

4. Once it is done with the initial restore you can choose to lock the bootloader by following the additional onscreen toolkit instructions.  If not, you can unplug your phone which should now be on stock 4.4.

Hope this helps.

Tuesday, November 19, 2013

CarbonRom: How To Guide on Customization

So I recently rooted my device and decided to go with a new ROM while I was waiting for 4.4 to hit the Nexus 4 and decided to go with CarbonRom.  It's an all around great ROM with many features from all of the most popular ROMs and so far I have had no regrets.  The point of this post is not to sway you to rooting or using CarbonRom, but just a few quick guides on how to do certain customization.  Let's begin:

This is what my current homescreen looks like at the moment.  As for the wallpaper, if you haven't read my post about Auto wallpaper (for reddit) you should definitely check out the app or if you prefer simple, yet color spectrum like wallpapers, check out Blur.  I'm also currently using the beta version of Nova Launcher which takes a few bits from 4.4 Kit Kat.

11.23.2013 - Added Minimized Lockscreen Challenge
11.24.2013 - Added CRT Animation

Hide the Status Bar
I like having the status bar hidden as it adds additional screen real estate.  I set it to where if I drag my finger down it will display the status bar and if I repeat the action it will open the notification menu.


Quick Peek allows you to swipe down to display the status bar briefly and I have the status bar hidden at  all time.  If you wish you can set it do display when you have notifications which some might find useful.

Transparent Navigation Bar
The status bar and the navigation bar in 4.4 KitKat is transparent which is great because it makes the screen a look a lot larger compared to it's previous iteration.  I also made the bar smaller so it doesn't take up as much space considering it's not really displaying useful information.  If you want to completely hide it you can do so and then activate Pie Controls.  In my case since the status bar is hidden at all times I left the transparency for it at 0% because otherwise I found it difficult to read.

Arrow Keys on Keyboard
Something I thought would be strange to have I've found to be extremely useful.  I no longer have to fiddle around with the blue cursor trying to perfectly place that damn cursor line one more letter left or right.  With this setting it simply adds a left and right arrow along your navigation menu to help with those pesky cursor issues.
 

Minimized Lockscreen Challenge
When you have gorgeous wallpapers why block them with a keypad when you power on your phone.  Making this change will also allow you to see any larger widgets you might be using.  I had previously used Dashclock and had it display things like email, messages, and news, and with the keypad hidden I was able to see a more detailed view without having the expand the widget.
  

What it looks like when the lockscreen challenge is hidden.

Disable CRT Animation
If you don't like the CRT Animation you see when your display turns off you can disable it.  If you do like you have the option to change it from being a horizontal animation to a vertical one if that is what you prefer.  Unlike most of the CarbonRom settings, this one is actually in Display.


I'll continue to add more settings I find useful as I familiarize myself with CarbonRom.

Sunday, November 17, 2013

Feature List Breakdown of Popular Android ROMs

I recently stumbled across this Google Document that gives a nice comparison of features that each ROM includes.  It's pretty extensive and can give you a clear idea of what ROM you might want to try.  While it might not contain every ROM it does include the popular ones.  Hopefully this will make your decision a bit easier.

ROM Comparison Google Document

Saturday, November 16, 2013

How to Unlock the Bootloader and Root Your Nexus 4 on OS X

I finally made the dive into installing custom ROMs on my Nexus 4 but as you all know you need to have a rooted device.  I wasn't able to find very clear instructions on how to root my device, most of the ones I found were not very descriptive, so hopefully this will help clear things up.

*Images will be added shortly.

Notes:
============
I'm sure these steps are very similar on Windows, using Command Prompt instead of Terminal, but I used OS X so I can't make any guarantees if the steps are not exactly the same.

This might not be the best or easiest way, but everything I found was very similar and this method worked for me.

This works for all Android versions which includes Android 4.2.1, 4.2.2, 4.3.x, and 4.4 KitKat.

This guide includes making a backup and restoring everything.

Uses ClockworkMod.

Recommended:
============
Remove any type of security to access your phone whether it be a PIN or Pattern. (might cause issues when trying to backup).

Turn on Airplane mode to prevent any updates or incoming new messages to not be backed up.

Save the downloads and extract them to your Desktop.

Downloads:
============
Android File Transfer - Will be used on OS X to backup your data.
Nexus4Root - Contains the main files to unlock bootloader.
CWM SuperSU - Roots the device and installs SuperSU on your phone.  If using 4.3 or 4.4 use this file.  If using an older version of Android, use the one included in the Nexus4Root.zip.
Clockwork Recovery Touch - Nexus4Root includes a version of this but if you want the latest you can download and replace the file in the Nexus4Root extract.

Guide:
============ 

Go to Settings > About Phone
Tap the Build Number until you see the "You are now a developer" message.
Go back to Settings and select Developer Options.

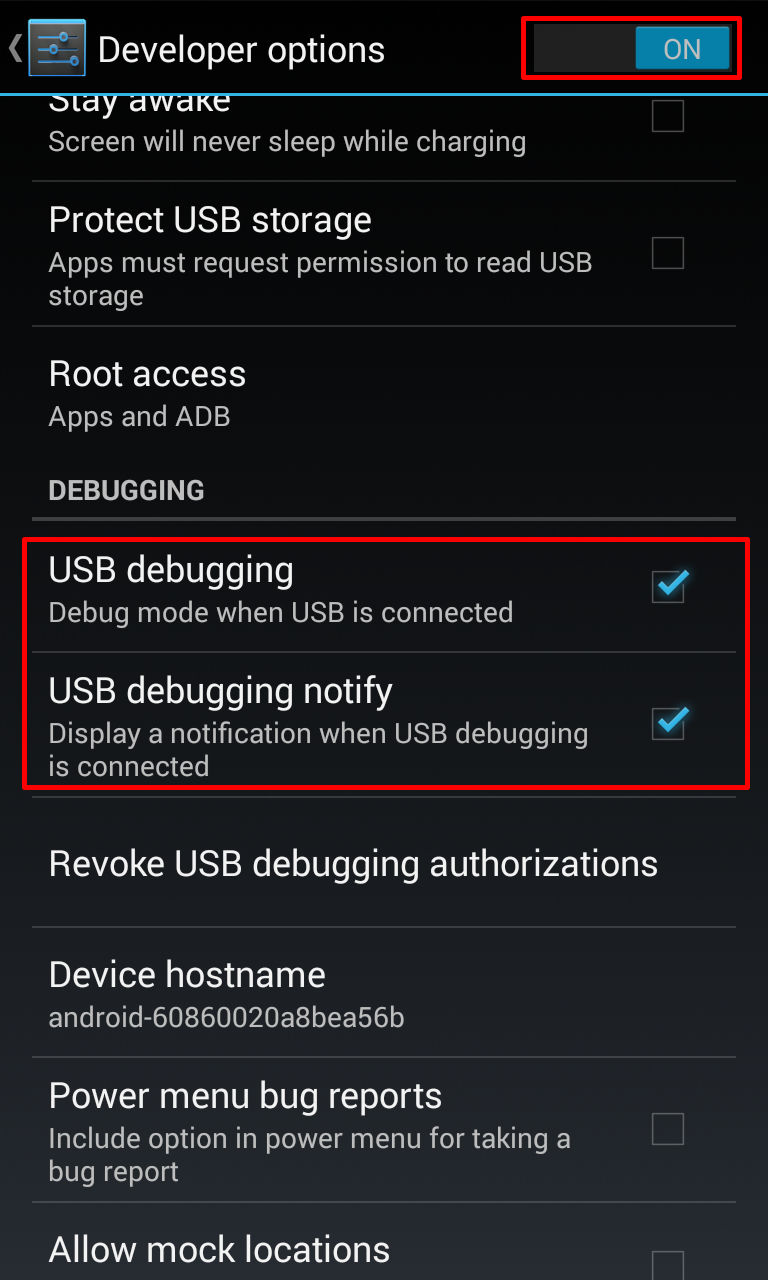
Turn on Developer Options and make sure USB debugging is checked.
If you haven’t downloaded and installed Android File Manager do so now. Also download and extract Nexus4Root to your desktop.

Connect a micro-USB cable to your phone and computer.  If you've already installed Android File Transfer it will most likely automatically open.

Backup your phone by copying all the files from Android File Transfer to a folder on your OS X desktop.

*If it looks like it is stuck your phone may have some security setting whether it is a PIN, Pattern, etc.  Unlock your phone and the transfer should start.

Open Terminal on OS X.  Using Spotlight would be the easiest way to open it.

In Terminal type cd Desktop/Nexus4Root
In Terminal type chmod 755 *

In Terminal type ./adb-mac devices


*You should see device meaning it is being detected.  If it is not listed or is offline, unplug the phone from the computer and plug it back in again.
In Terminal type ./adb-mac backup –apk –all –f backup.ab

On your phone it should display an option to backup your data.  Select Back up my data. If you wish to encrypt it with a password you can, I did not.

*The backup may take anywhere from 1-20 minutes depending on the amount of data you have on your phone.  If it looks like it is stuck, it most likely is not, just give it some time.

Once completed Power off you device and unplug it from the computer. 

Press and hold the Power button and the Volume down button until you see the bootloader menu.

Your phone should say that it is locked on the bottom of the bootloader screen which is normal.

On the bootloader screen plug in your micro-USB cable from the computer to your phone.

Go back to Terminal on OS X and type ./fastboot-mac oem unlock

*This will wipe your phone.  Hopefully you made a backup in the earlier steps.

On your device press the Volume Up button to select Yes.  Then press the Power button to confirm.  You should now see on the bootloader screen where it used to say locked it now says unlocked.  You have successfully unlocked the bootloader.  Press the Power button again to reboot your phone.

*While booting your should notice an unlocked lock which also means the bootloader has been unlocked.

Once your phone has booted you will see the set up menu as if it’s a new phone.   Everything has been wiped.  Go through the set up process until you get to the homescreen.  You can just skip everything as we’ll restore your content and settings later.

Reconnect your phone if it is not connected and copy the file CWM-SuperSU.zip by dragging and dropping it onto your phone using Android File Transfer.  Copying and pasting does not work.

Power off your phone and boot it while holding the Power and Volume Down button until you see the bootloader screen.

Go back to Terminal and type ./fastboot-mac flash recovery recovery*.img

If everything works you should see some OKAY messages in Terminal.

On your phone use the Volume toggle to switch to Recovery mode, then press the Power button.

Once in ClockworkMod(CWM) Recovery select “install zip from sdcard”.

Then “choose zip from sdcard”.

Select “0/”.

Browse/scroll and select CWM-SuperSU.zip file, the one you copied over, and select Yes, which will root your phone and install the SuperSU app.

Once completed navigate back to the main screen and select reboot system now.

If you see a message about the "ROM may flash stock recovery on boot. Fix?” select Yes.

Once your phone has rebooted you should now see a SuperSU app in your app drawer.

Congratulations, your phone is now rooted.

Time to restore your previous settings.  If you made a backup by copying all your files from Android File Transfer from your phone to your computer you can reverse the process and copy all of the files from your computer to your phone.

You’ll most likely have to re-enable Developer options by going to Settings > About phone then tapping on the Build number until you see the message saying “You are a developer”.

Go to Developer options, make sure it is on, and make sure to enable USB debugging.

Next, in Terminal type ./adb-mac restore backup.ab

On your phone selected Restore my data.

*Again, depending on how big the backup was it may take anywhere from 1-20 minutes.

Once done your phone should be back to what it was before starting this process, but with the addition of root access.

*Some apps may require you to re-enter your password.

Wasn’t so hard now was it, just a tad bit long?  Hope this helped.  Now go and install a custom ROM or kernel.

Enjoy!!

Not sure which ROM you want to try.   Check out my other article.

Thursday, November 14, 2013

Popular Android ROM Features in Infographics and GIF's

So I recently decided to install a new ROM on my Nexus 4 but I was sure which one I wanted or which ROM was the best for me.  The most well known seems to be CyanogenMod, but there are so many to choose from.  I repeatedly saw these same four ROMs (not ordered in any way):

1. CyanogenMod
2. CarbonRom
3. AOKP
4. Paranoid Android

After a lot of reading and some video watching on YouTube, I decided to go with CarbonRom since it seemed to have a little bit of everything.  I can't give an opinion just yet, but what I can say is that it has so far been a great, solid rom.

While browsing one day I ended up stumbling across these awesome GIF's displaying most of the features for each of the ROMs I listed above.  You'll notice that most of the ROMs share the same features but each has it's own tweaks.  Below are some examples of what you can expect with links to the complete list of GIFs.  Hopefully this helps give you a better understanding of what each ROM is capable of doing and makes your decision easier.

All the credit goes to a user by the name of wamen_noodles over at Reddit who took the time to create the GIFs.
Reddit Post Link

A more extensive breakdown of features per ROM.

CyanogenMod


Complete CyanogenMod GIFs

CarbonRom


Complete CarbonRom Gifs

AOKP


Paranoid Android


Wednesday, November 13, 2013

Android App Review: Auto-wallpaper (for reddit)

On my OS X Desktop I have an app called Wallpaper Wizard, which I recommend, which automatically rotates the desktop background based on topics you have subscribed to (nature, space, etc.).  I recently wanted to have a similar feature but for my Nexus 4.  After some browsing I finally stumbled across an app called Auto-wallpaper (for reddit).

It basically follows the same notion, where you can have your wallpaper automatically change based on a set time duration.  What they use as topics/themes are Reddit's subreddits, such as Earthporn, Waterporn, Spaceporn, etc.  They have a few that are predefined but you do have the option to add your own subreddit if you wish.

It's a basic app that only changes your wallpaper, but can add a new fresh look to your phone.  I really enjoy it and recommend checking it out.


Pros:
+ Free
+ Easy to use
+ Can set update interval
+ Can set to update only on wifi

Cons:
-None

Friday, November 1, 2013

Android: Easiest way to install an APK, Use Dropbox


So Android KitKat 4.4 AOSP was recently released and there have been numerous people extracting the APK's for apps to install on current devices.  If you want to install it there are numerous methods on doing so.
The easiest I've found, which requires Dropbox and the ability to install from Unknown Sources, was to just drop the APK in your Dropbox account.  Then from the phone select it and it will download to your phone.  You'll be prompted to install the APK, or update your current application, and from there you just click Install.  That's it.

Link to Available Installable Apps

Wednesday, September 4, 2013

AT&T Nexus 4 Data Speeds Slow APN Settings

**Updated 09.11.2013**

I recently purchased and switched to the Nexus 4 from an iPhone 4S and was receiving poor data speeds on AT&T, like 0.01Mbps down.  I found multiple APN configs online but none of them seemed to work for me. I finally came across one that did and hopefully it works for others.  Keep the auto-generated APN settings profile and just create a new profile with the options below:

Settings>Wireless & Networks>More...>Mobile networks>Access Point Names:

Name: AT&T HSPA+
APN: phone
Proxy: <not set>
Port: <not set>
Username: <not set>
Password:<not set>
Server:<not set>
MMSC: http://mmsc.mobile.att.net
MMS proxy: proxy.mobile.att.net
MMS port: 80
MCC:310
MNC:410
Authentication type: <not set>
APN type: default,supl,mms,hipri
APN protocol IPv4


**Added 09.11.2013**

This part was key for me.  Go to your phone and dial *#*#4636#*#*.  You should now be in a Testing Settings section. Go to Phone information and scroll down and it should say WCDMA preferred.  Change this to GSM auto (PRL).  I found that this option works best for me.  You can experiment and try other options to see if you can get better speeds or if you have Straight Talk, etc.  I originally saw someone suggest LTE/GSM/CDMA auto (PRL), but it didn't work for me.

I'm now getting around 8.0Mbps+ down and 1.0Mbps+ up.

If you have a grandfathered iPhone unlimited plan you should be able to keep it.  I've read on the AT&T forums that people have switched phones multiple times and retained their grandfathered unlimited iPhone plan, so don't switch plans unless that seems to be your last resort.

*While it shouldn't be necessary you could reboot the phone.

Good luck.

Get Moto X like notifications on your Nexus 4 for FREE